Making minis Shine: A Guide to Non-Metallic Metal (NMM) Techniques for Miniature Painters
Non-Metallic Metal (NMM) is a painting technique used to create the illusion of metal surfaces without using metallic paints. Instead, painters use gradients of non-metallic colours to simulate the reflections and highlights found on metal. This technique requires a solid understanding of light and shadow, as the goal is to mimic how light interacts with shiny surfaces.
A technique favoured by many professional miniature painters. With NMM, you can make your minis stand out on the tabletop or in your display cabinet. Whether you’re a hobbyist just starting or looking to refine your skills, this guide will help you achieve that metal magic with a brush and some patience!

1. Understanding Light Sources:
Before you commence painting, take a moment to deliberate on your light source. Visualize the direction from which the light emanates in relation to your miniature. Whether it's the brilliance of an overhead sun or the subtle glow of a torch flickering from below, this initial determination serves as the cornerstone for your artistic journey. By aligning your understanding of the light source, you lay the groundwork for the placement of highlights and shadows, effectively crafting the illusion of metallic surfaces.
Practical techniques for referencing light sources prior to painting can greatly enhance the authenticity of your creations. One approach involves physically positioning a light source, such as a lamp or flashlight, to mimic the intended lighting conditions for your miniature. Observing how light falls on various surfaces under these conditions can provide valuable insights into where highlights and shadows should be placed. Additionally, studying reference images or objects under similar lighting can help inform your decision-making process. By incorporating these techniques, you ensure that your miniatures not only reflect the realism of their imagined environments but also maintain a cohesive visual narrative.
History time! - Caravaggio, the master of chiaroscuro*, employed ingenious techniques to depict metals with remarkable realism in his paintings. He meticulously observed the interplay of light and shadow in his surroundings, utilizing natural light sources to inform his compositions. Caravaggio's keen understanding of how light behaves on metallic surfaces allowed him to create captivating illusions of texture and sheen. By strategically positioning his subjects in relation to these light sources, he could manipulate the intensity and direction of illumination, thereby accentuating the reflective properties of metals. Whether it was the glint of a sword's edge catching the sunlight or the subtle gleam of armor under candlelight, Caravaggio's mastery of light reference imbued his paintings with a palpable sense of depth and dynamism, elevating his works to iconic status in the annals of art history.
*Chiaroscuro is an artistic technique originating in the Renaissance and flourishing in the Baroque era. It involves the dramatic use of light and shadow to create depth, volume, and atmosphere in two-dimensional artworks. Through strong contrasts between light and dark areas, artists evoke a sense of realism and emotional depth. Chiaroscuro is achieved by observing how light falls on surfaces and employing various light sources to create dynamic compositions. It has been widely used across different artistic mediums and continues to captivate viewers with its dramatic visual impact.

2. Utilising Colour Theory:
Remember that colour theory is your best friend when picking and applying paints. Start by exploring the colour wheel - it's like your roadmap, helping you choose colours that make your metals look realistic. Think about the temperature of the metal you're painting—cool for steel, warm for gold—and pick colours that match. Don't forget about light and dark! Playing with lightness and darkness creates highlights and shadows that bring your metals to life.
When using the colour wheel to enhance your Non-Metallic Metal (NMM) painting, think of it as your trusty tool for colour harmony. Start by identifying the main colors of your metal—whether it's silver, gold, or bronze. Look at the colour wheel to find their complementary colours. These are the colours opposite each other on the wheel. For instance, if you're painting silver, consider using shades of blue or purple to create depth and contrast. If it's gold you're working with, look to warm tones like oranges or yellows to add richness. Analogous colours, which are next to each other on the wheel, can also work wonders for blending seamlessly. Experiment with different combinations to find the perfect palette that brings your NMM masterpiece to life.
Another history lesson (sorry) - Caravaggio, adeptly utilised colour theory in his depictions of metallic surfaces, such as in "Judith Beheading Holofernes" and other works. By leveraging principles of colour temperature and contrast, he skillfully portrayed the reflective qualities of metals like silver & brass. Warm and cool tones were juxtaposed to create depth and dimensionality, while precise rendering of highlights and shadows added luminosity and weight to the objects.
3. Expert Colour Selection:
Selecting the right base colour is the foundational step in painting convincing metallic surfaces. Your choice should reflect the type of metal you're depicting, ensuring authenticity in your final piece. For steel or iron, opt for base colours that lean towards shades of grey and blue, capturing the cold, industrial essence of these metals. Conversely, if you're aiming for the warmth and opulence of gold, incorporate hues of yellow, brown, and orange into your palette. These base colours set the stage for the intricate interplay of light and shadow that brings metal to life.
Once you've established your base colour, it's time to add depth and dimensionality through careful shading and highlighting. Begin with a mid-tone that serves as the foundation of your metal surface. A neutral grey is ideal for steel, providing a versatile starting point that can be easily adjusted. Introduce shadows by gradually mixing in darker tones, such as black or a deeper blue, focusing on areas where light would naturally be obstructed or less intense. These shadows add depth and contrast, enhancing the realism of your metal rendering. Conversely, for highlights, turn to lighter greys or pure white (or even yellow or blue) to emulate the gleam of direct light on reflective surfaces. Concentrate these highlights on areas that catch the most light, such as edges and protruding details, to create a sense of luminosity and dynamism in your painting.
Tip - For painting steel or iron without metallic paints, consider using acrylic colors such as Vallejo's "Neutral Grey" or Citadel's "Mechanicus Standard Grey" as your base color. These tones provide a solid foundation for achieving the cold, metallic appearance characteristic of steel. To deepen shadows, mix in a bit of Citadel's "Abaddon Black" or Vallejo's "Black" to your base color. For highlights, Citadel's "Administratum Grey" or Vallejo's "Cold Grey" can be layered on top, especially on areas directly hit by light, to create a striking contrast and enhance the metallic sheen. These non-metal paints offer excellent coverage and blendability, making them ideal choices for achieving realistic steel or iron effects in your artwork.

4. Understanding Metals:
Harsh lines help define the edges and contours of metallic surfaces, providing contrast between light and shadow. Without these sharp delineations, the metallic effect might appear flat or lack definition. For instance, the sharp line between a highlight and a shadow on a metal surface creates a striking visual contrast that enhances the perception of its reflective nature.
Metals are highly reflective surfaces, meaning they bounce light in distinct ways. Harsh lines mimic the abrupt changes in reflection and highlight how light interacts with the surface. This is particularly evident in polished metals where you might see sharp reflections of light sources or surroundings. By incorporating harsh lines, you can simulate these reflections realistically, adding depth and dimension to your NMM.
Metals have a unique material quality characterized by their smooth surfaces interrupted by distinct features like scratches, dents, or edges. Harsh lines can emulate these imperfections, contributing to the authenticity of the painted metal. By strategically placing harsh lines, you can simulate scratches, wear, or the edges of metal plates, enhancing the overall realism of your miniature or artwork.
Tip - In art, contrast is often used to draw the viewer's attention to specific areas. Harsh lines create visual interest and focal points within the NMM, guiding the viewer's gaze and enhancing the overall composition. By carefully integrating sharp lines alongside smooth blends, you can create dynamic and engaging metallic effects that captivate the viewer's attention.

5. Simulating Reflections:
Metals possess a high degree of reflectivity, and translating this onto your miniature requires a meticulous approach. An excellent starting point is to immerse yourself in reference photos of actual metal objects. These images offer invaluable insights into how light interacts with different metal surfaces, guiding you in replicating realistic reflections.
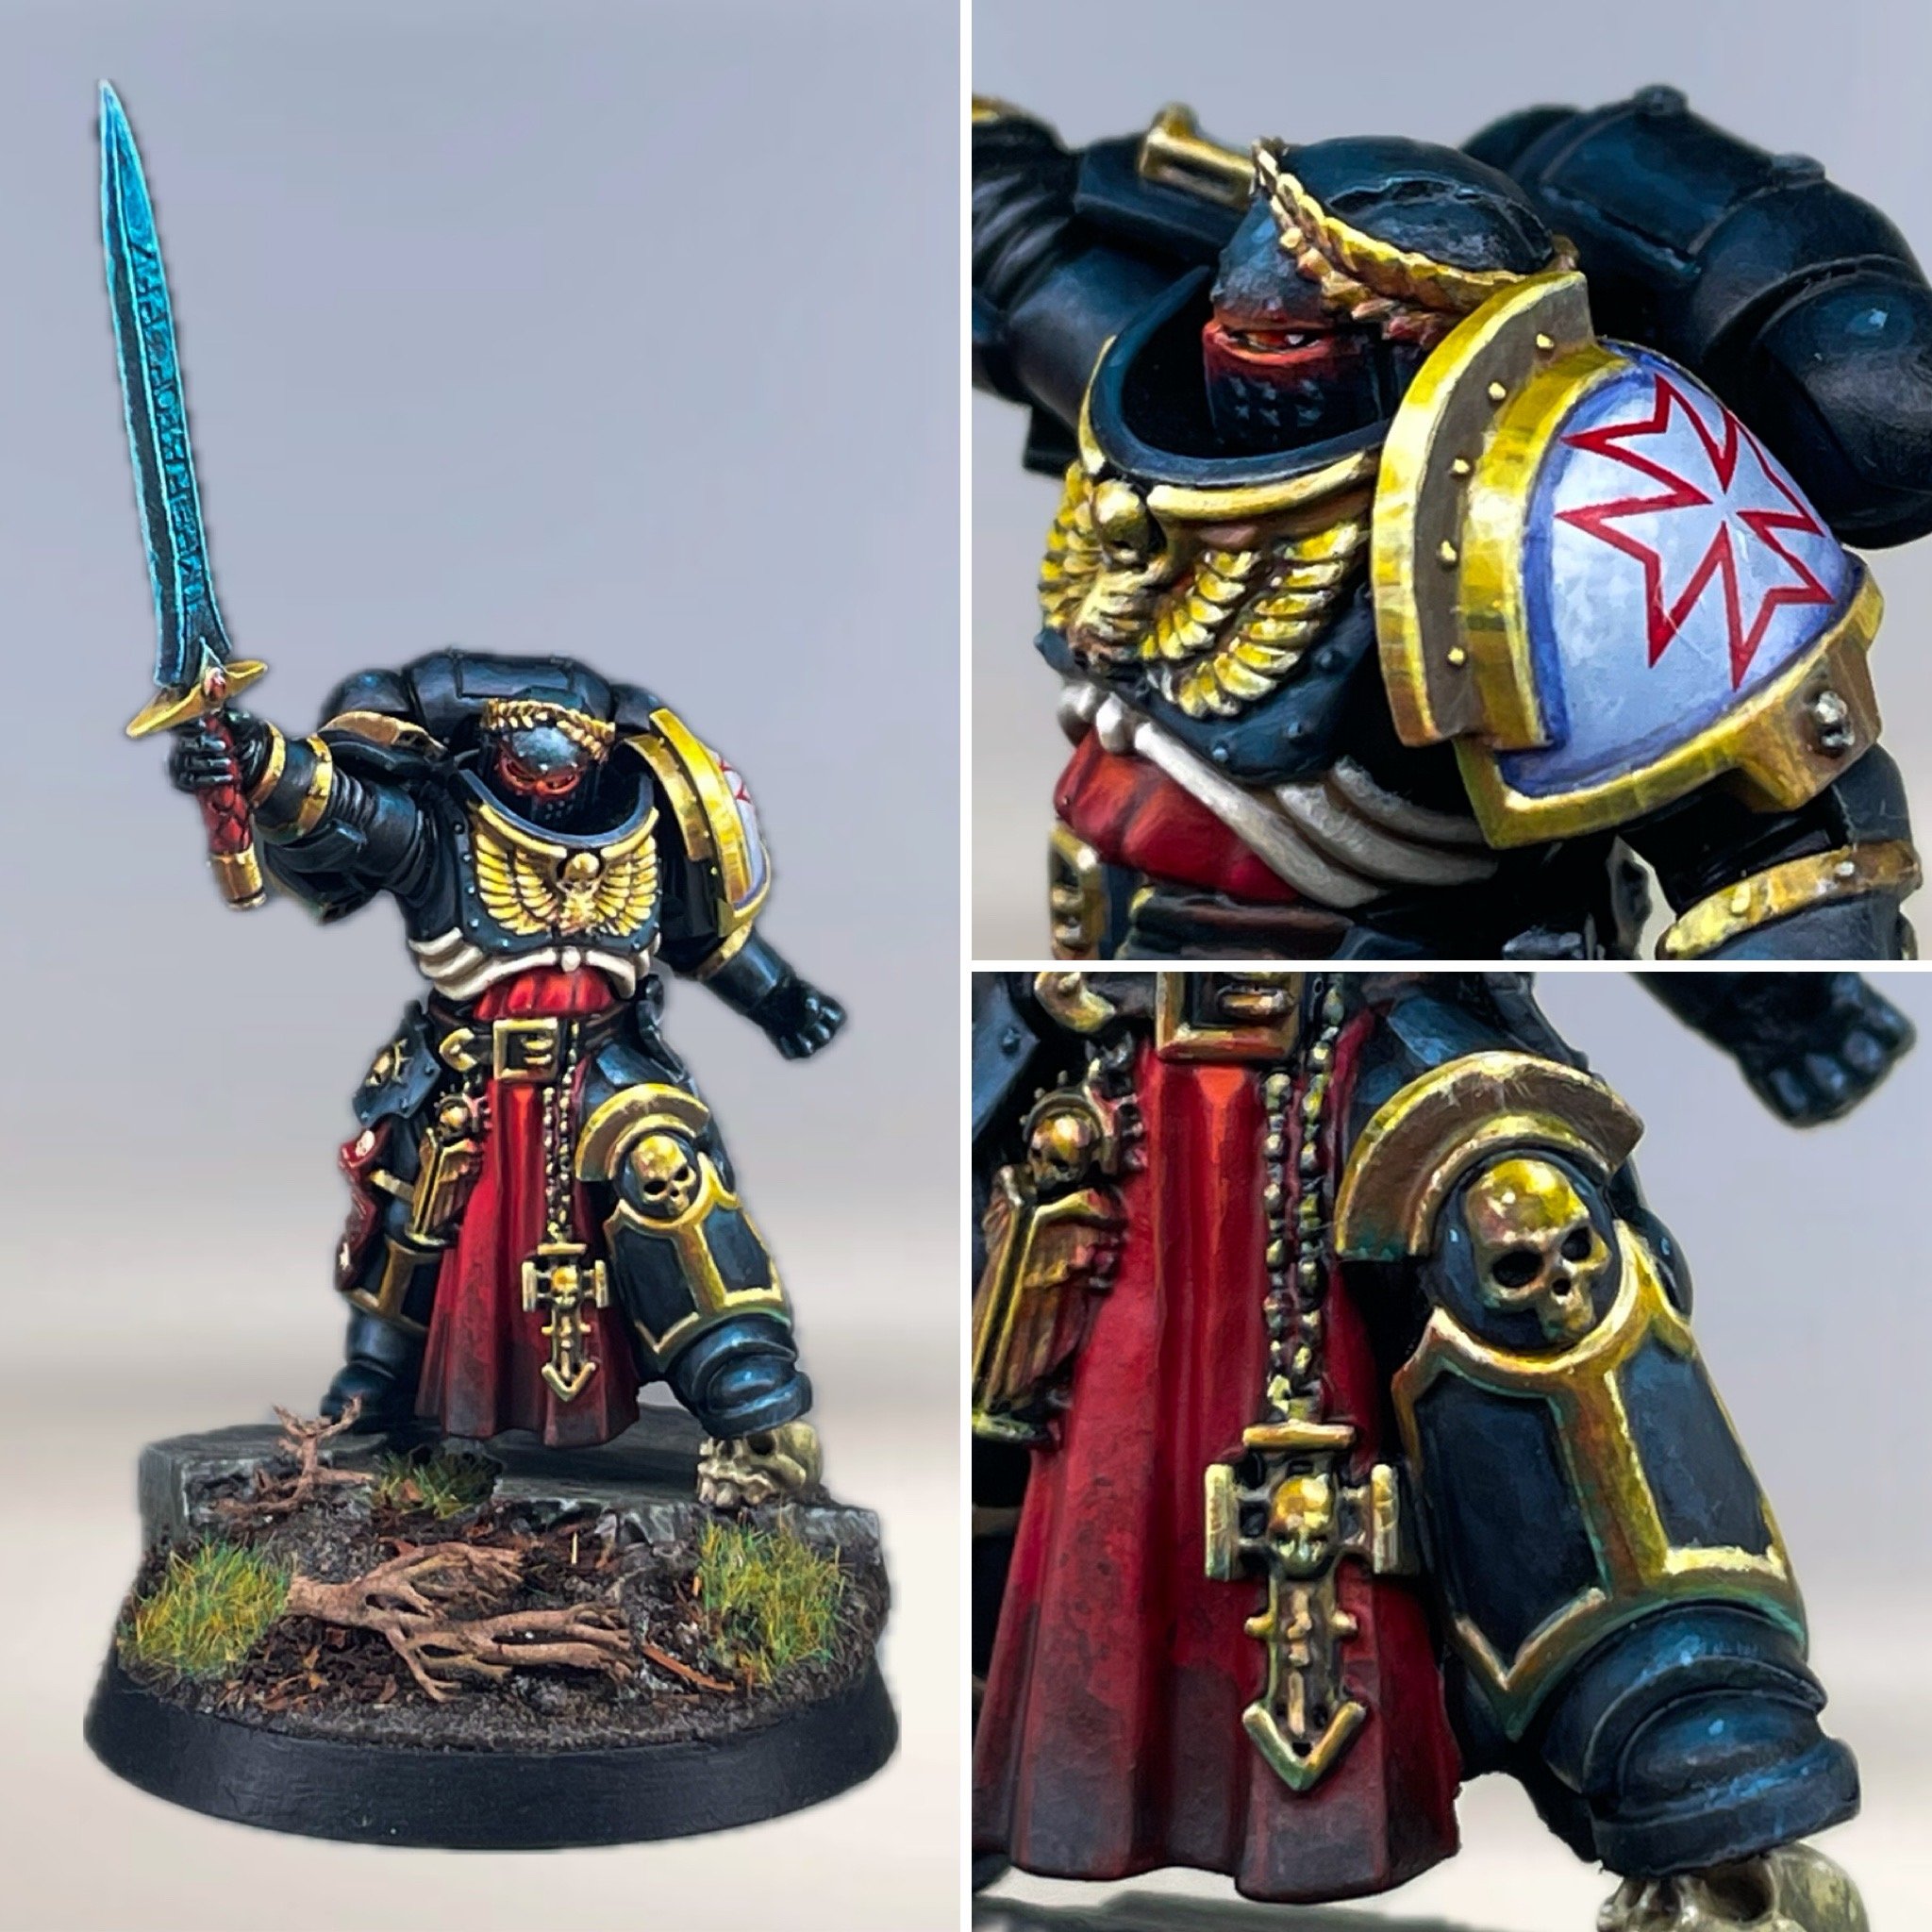
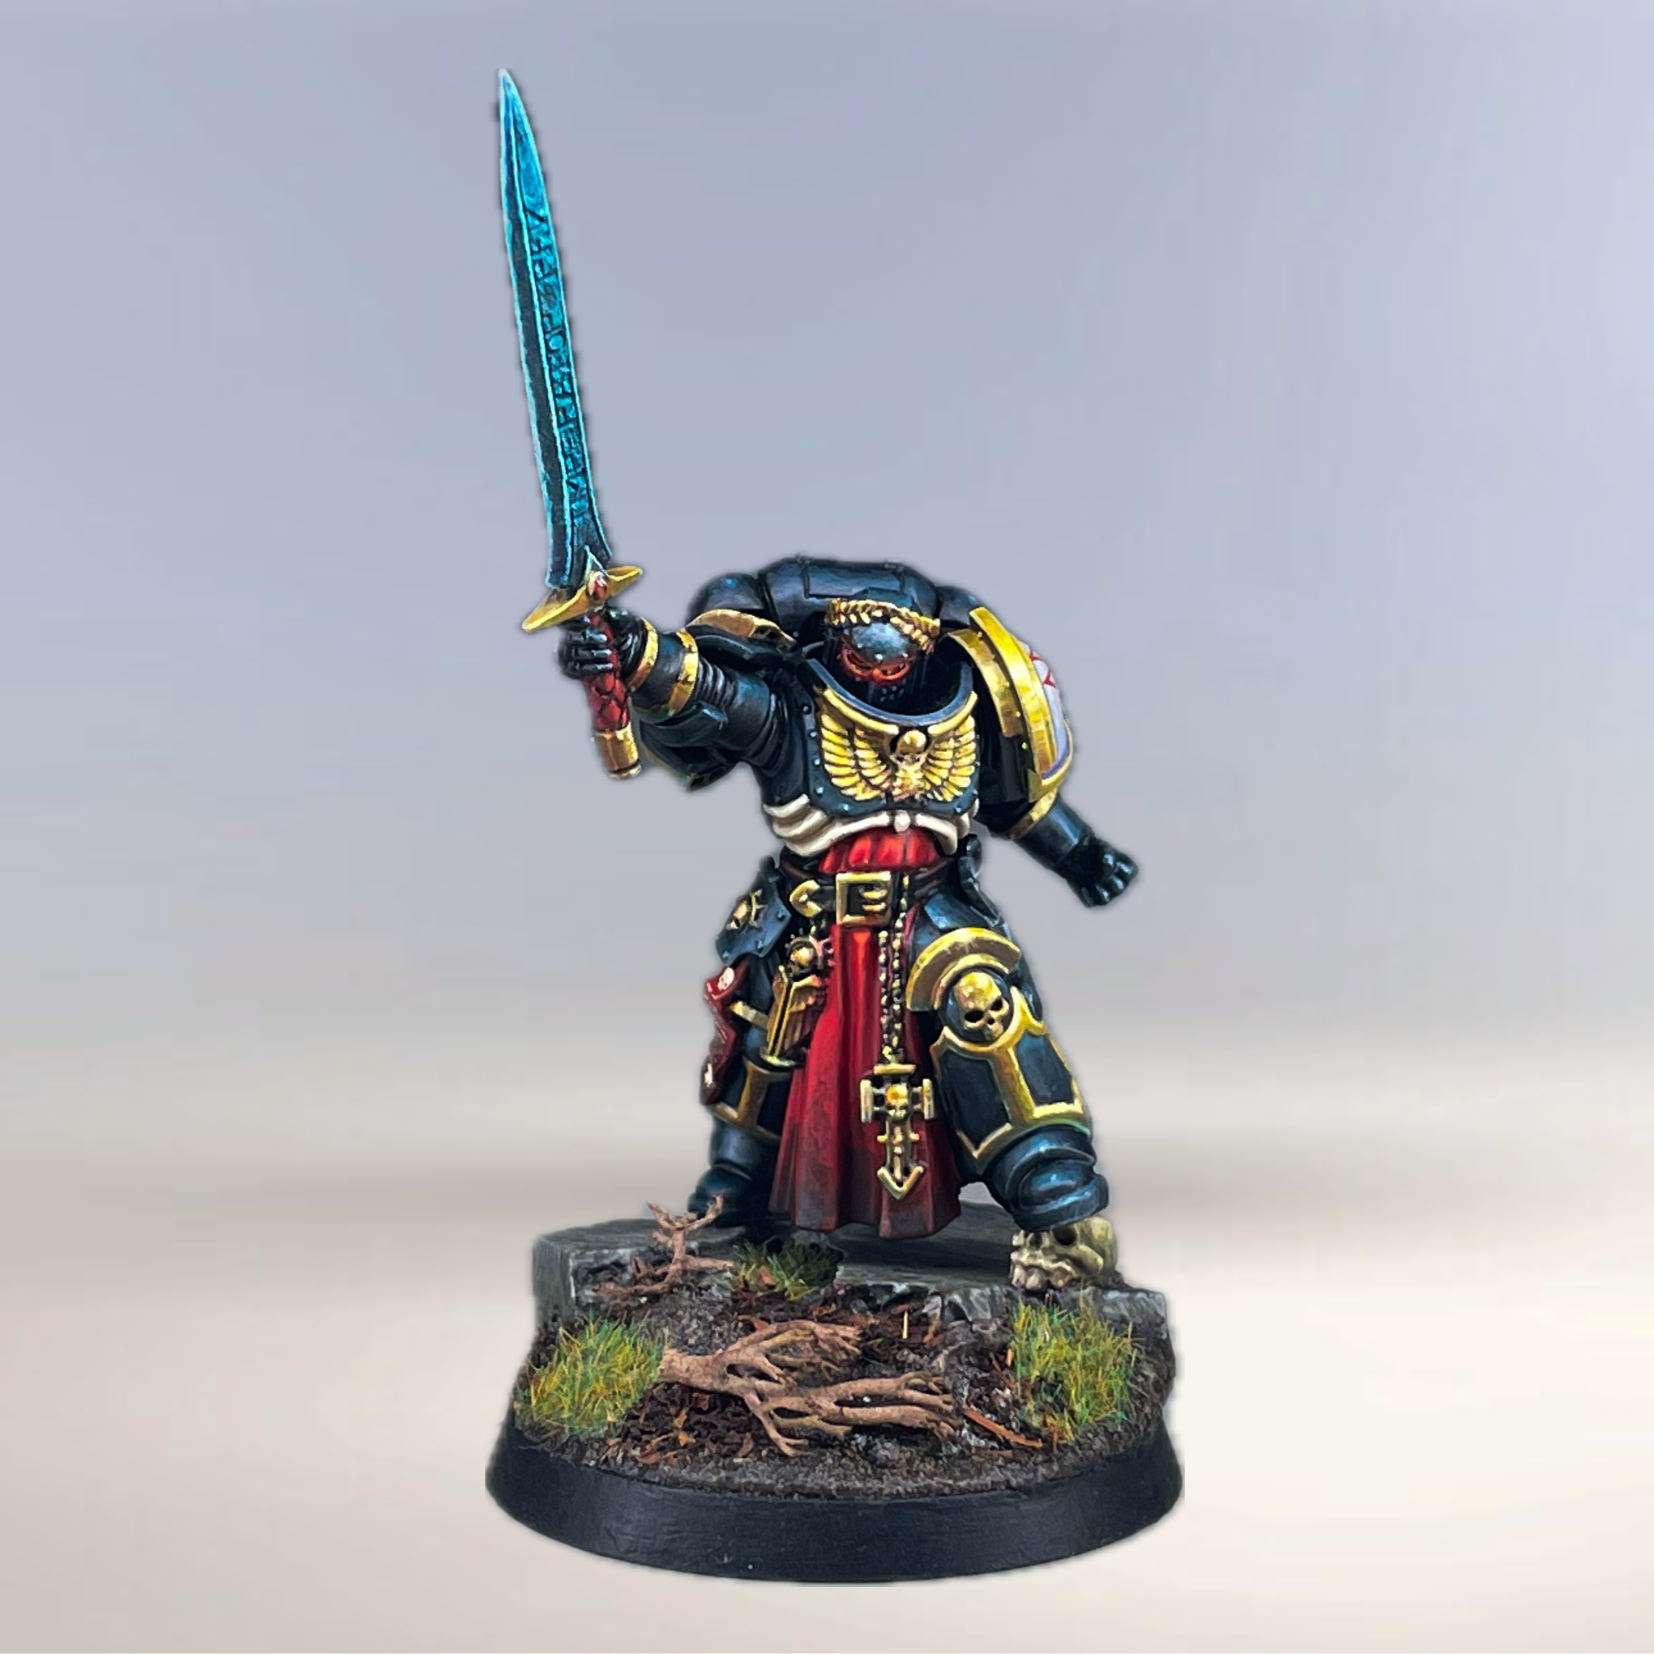
One effective technique to emulate reflections is by creating extreme highlights and deep shadows. For instance, envision a sword blade where a stark white highlight adorns the edge where direct light would strike, juxtaposed with a deep shadow nearby. This stark contrast effectively simulates the sharp, reflective qualities inherent in polished metal surfaces.
Incorporating the colors of the surrounding environment is another pivotal consideration when painting reflections on NMM. If your metal object exists amidst green foliage, for example, infuse hints of green into the reflections to suggest the environmental influence. This not only adds depth but also contributes to the authenticity of your miniature portrayal.
While working on reflections, it's essential to blend colors gradually to avoid abrupt transitions that can detract from realism. Smooth transitions between extreme highlights and deep shadows create a more convincing illusion of reflective surfaces. Experimentation with layering and glazing techniques can be particularly beneficial in achieving this effect, allowing you to build up highlights and shadows gradually while incorporating subtle color shifts.
Ultimately, patience and precision are paramount in achieving lifelike reflections in NMM. Careful observation of reference photos and meticulous application of techniques will enable you to bring your miniature creations to life with stunning metallic effects.
6. Practising on Models:
Starting small offers several advantages. It provides an opportunity to hone essential techniques, such as blending, highlighting, and shadowing, without the pressure of tackling intricate details all at once. By focusing on specific elements, like weapons or small armor pieces, you can refine your brush control and precision, laying a solid foundation for more advanced NMM painting in the future.
As you progress in their skill development, you can gradually increase the complexity of the models you’re work on. Beginning with basic shapes and surfaces, you can progressively advance to more intricate designs and larger areas of a miniature. This incremental approach ensures steady improvement and fosters a deeper understanding of light, form, and texture.
Practicing on specific components of a model allows for focused learning and experimentation. Whether it's mastering the reflection of light on a sword blade or perfecting the transition from highlight to shadow on a helmet, you can immerse yourself in exploring NMM techniques in detail. Each practice session becomes an opportunity for discovery and refinement.
When selecting miniatures for NMM practice, you should look for models with well-defined metallic elements that lend themselves to focused attention. Fantasy miniatures with swords, shields, or helmets, sci-fi models featuring futuristic weapons and armor, or historical figures adorned in intricate armor—all offer diverse opportunities for NMM exploration.
Thank you for taking the time to read this blog post! I trust you found this guide illuminating for your project needs. I'd love to hear from you—please leave a comment below sharing your thoughts or questions. Additionally, if you have ideas for future blog topics or specific techniques you'd like me to cover, feel free to suggest them!
For further insights, tutorials, and exclusive glimpses into my creative process, join me on Instagram. If you're keen on commissioning a bespoke miniature, simply click the link below to get started. Your feedback and ideas are invaluable in shaping the content I create, and I look forward to connecting with you to bring your miniature visions to reality!